Pages

Monday, April 30, 2012

Doggie Kisses

Trying to have some fun photo time with Gizmo...he had stinky breath LOL!


I have a Dirty Secret!


I have always been a fan of dry shampoo.  It's been years since I washed my hair everyday!  If you asked me in high school I would tell you I have very greasy hair...it would be dirty by the end of the day.  Now some of this was teenage hormones, and the fact that I touched my hair all day long contributing to the dirty factor.

But then I got a perm (big mistake.....ewww) and I started washing it every other day.  When my perm grew out, I had gotten used to not watching it everyday, its nice to sleep in a little extra when you don't have to do your hair.

I would occasionally wash just my bangs to give my hair a fresher look.  I would still have a day here and there where my hair was a little dirty on day 2, so I used dry shampoo.  Being a dry shampoo novice I just got what was in the drug store and didn't really think about it.  I was using Salon Grafix Invisible Dry Shampoo...I got it at Walgreens.  It worked fine...the way I figured dry shampoo worked.

Then the other day in the grocery store I saw Rockaholic.  It's more than twice the price of the Salon Grafix, but sometimes you really do get what you pay for...so I thought i'd give it a try...

AMAZING!!!

With the help of the Grafix I could make it 3 days, but day three was a little rough looking.  With the Rockaholic I could easily make it 4 maybe even 5 days without washing!!!  It's amazing!!!  Now, like I stated earlier, its been years since I washed may hair everyday, and its been about 6 months or so since I've been washing it every 3 days (about every other time or so...not every time).  So my hair has gotten accustomed to not being washed everyday...they say it takes a few weeks for your hair to stop producing as much oil.  But I stand by my statement...this dry shampoo is amazing!!!  It smells great it's  easy to use, and it makes you hair look as good as it does the day you wash it!!!

Give it a try...I spend a little more time on day one (volume gel, root lifter, blow dry, curl, add a little Dust It, finish and spray) and then on day two I blow dry for volume, brush, and re-curl...day three use dry shampoo, brush and re-curl...day four use dry shampoo, brush, and wear up!


Sunday, April 29, 2012

Crocs and Charlotte Russe

I did a little shopping today....I defiantly have a bit of a shopping addiction!
I have never been a fan of Crocs....I don't care how comfortable people say they are...they are so damn ugly!  Seriously!!!  But, the Crocs people must have figured out that if they made their shoes more attractive, more people would buy them.....may I present the new age of Croc!


How cute are these!!!!  And they are so damn comfortable its not even funny!!! 


My next stop was to Charlotte Russe.  I love this store so much!!!  I have been on a hunt to find a pair of cute red earrings for my sister's bachlorette party this weekend.  I have found a few pairs, but nothing that I really liked...my taste is what some might called "eclectic" or just "unique".


I went in for a pair of earrings and came out with al of this!!!!  They were having a $5 sale.....all the jewelry in the whole store was $5!!!!  I got all this for $37, one of the bracelet sets was only $.99. 


Gold Stripes

My most recent nail adventure...
I really like the Seche line of nail products...this time I used their matte base coat.

I found this tool in the basement.  My grandfather used to carve and paint ducks, he used this tool for painting ducks, I use it for removing paint from around my nails, and also for making polka dots :)


Next I painted 2 coats of Orly's Luxe over all my nails.


This was my first experience with Seche Vite.  It dried like magic..so super fast it was amazing!  The glossy shine it beautiful.  However, it is day two and I have three small chips in three of my nails.  I'm not sure if I just didn't apply the top coat thoroughly, or if this a not a long lasting top coat...we shall see.


After my nails were dry (which was less than 5 min...seriously) I applied a white strip to each nail.  These are supposed to be used to paint french tips, but use your imagination...use what you can find! 


Next I applied a thick coat of Borghese's Espresso Brown....remove the strip right after you apply the polish...one nail at a time.


Then I finished off with another coat of Seche Vite...all finished!


Wednesday, April 25, 2012

OneSole...Best Shoes EVER!!!


I have had these shoes for a few years now, and they are the best shoes on earth!!!  I am thinking about getting another pair this summer...maybe brown.


They are really great for going on vacation...you can have several pairs of shoes in one!  Pack a few topers, and BAM...a new pair of shoes.  Not to mention they are one of the most comfortable pairs of shoes that I own.


I don't know that I've ever gotten more complements on a pair of shoes.  There is a toper for every occasion, every holiday, every outfit! 


You just snap the top off and snap on a new one.  The snaps are a bit of a bitch to get on and off, but they have to be secure...you wouldn't want your shoe to fall apart while you were wearing it.


I keep all my topers in the box the shoes came in...I have 12 different topers right now, so I have 12 different pairs of shoes in one box!


They also have clog topers!!!  
I get mine from a store in Bethany Beach...but I've never seen them sold anywhere else.

Crack-A-Lackin

I have found a fellow blogger who has the most amazing nail design ideas, tips and tricks.  You can find her blog here : http://chloesnails.blogspot.com/ 

I have had some amazing fun this week with my nails...


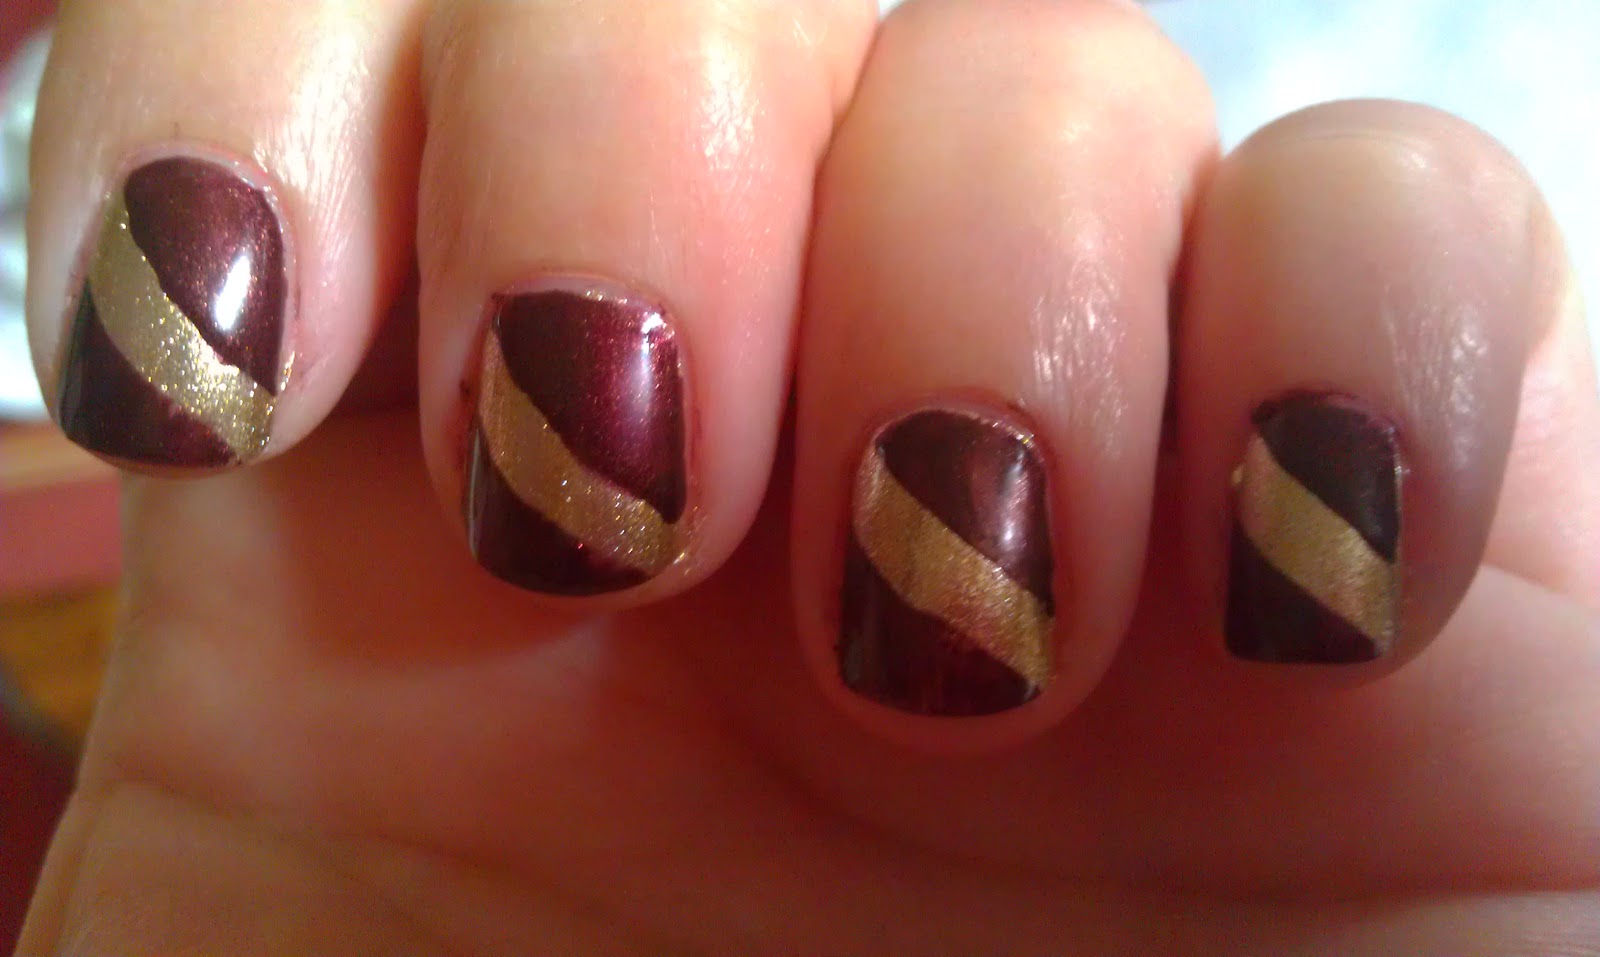
The nail godess (that's what I'm going to call her....because that's what she is) uses scotch tape for a lot of her designs.  Above is actually my second try.  I didn't own a quick dry top coat when I tried the first time.  The above was done with Essie's quick dry top coat.  Today I purchased some Seche Vite...the goddess highly recommends it...I'll let you know what I think.
For the above design I used Essie's oui madame over my whole nail...waited for it to dry, used Essie's quick dry top coat...taped off a section and used China Glaze's For Audrey over 2/3 of my nail...waited for it to dry, then applied the top coat...taped off another section and painted the tip with Essie's School of Hard Rocks.

Because of all the layers of polish, the paint job only lasted two days..but is pretty cool none the less.

Now I am sporting some China Glaze Crackle, and I'm lovin it!  It's such a unique look!
I started with my Instant Artificials base coat (my nails have been breaking a lot these last few weeks...between the piano and the ukulele, I just can't keep the from breaking).  I then used two coats of Orly's Passion Fruit...I loved the color so much I almost didn't do the crackle.  I read a few reviews about crackling, and most people said use a top coat over polish, before the crackle...so I did.


Then I used China Glaze's Cracked Concrete to complete the look...I also crackled my toesies!!!


Sunday, April 22, 2012

Supernatural


I just had to say that "Supernatural" is the best show ever!!!
I am new to the show, I started watching a month or so ago.  They have seasons 1-6 on Netflix Instant watch.  Every season just gets better and better.  I am currently in the middle of season 5, and the character of Cas cracks me up!

The show can get a little creepy at times, you have to remember it's not real.  There is a part of the story line where they are questioning if God exists.  I was a little rattled by this turn of events, being a Christian myself, but I have always enjoyed sci-fi books and movies, I just have to keep in mind that its not real.  

One must separate fantasy from reality, and enjoy the fantasy for what it is, but not let it alter your reality.
Plus I love Jensen Ackles!!!  I loved him years ago on Days of Our Lives, and I love him even more on Supernatural.

Enjoy this YouTube clip...you will understand why the show is so awesome!


Here is another Jensen Ackles clip from one of my favorite episodes "Yellow Fever"...you have to understand what is going on in this episode.  Dean has ghost sickness, and it makes him paranoid....I watched this clip like 10 times....laugh out loud funny!!!


Friday, April 13, 2012

China Glaze and Essie


Wow, what a difference good polish makes.  
I was getting so frustrated with my nail color only lasting 2 days before it would start chipping.  Even when I would use OPI or Orly... still I'd get chips.  
As soon as I switched to Essie I noticed a huge difference!  I love this nail polish!!!  The colors are beautiful, and they last. 
 I also really like China Glaze...tried Crackle for the first time tonight.

Below I have Essie School of Hard Rocks.... I've had this color on for a few days, and I wanted to add a little something.  I was in Sally's and they had all their Glaze's on sale for $1.99.  
I picked up the Cracked Concrete (grey) and the Fault Line (purple). 
Below I have Cracked Concrete over the Essie color.

The reviews I've read say the Glazes work great when you apply a thick coat (which I didn't read until after I had applied my thin coat...oh well)  
However, everyone seems to say that the purple doesn't work as well as the other colors...we shall see.


Published with Blogger-droid v2.0.4

Friday, April 6, 2012

Book vs Movie

Attention...if you have not seen the Hunger Games movie yet, you may want to stop reading this post now....I will be giving stuff away.  The same goes for the people who have seen the movie and now are going to go back and read the book....dont say I didn't warn you.


That said...I went to the movies yesterday with my mom and step-dad to see Hunger Games.  I have to say I was pleased and disappointed all at the same time.  I often feel this way when I watch a movie after I have already read the book.  I alway feel like to movies are so rushed, things happen way to fast.  I felt the same way about Twilight (not to mention that the first Twilight book was horrid).  Especially when it comes to the relationships of the characters.  I am sure everyone understood that it was very sad when Rue dies because she was so young and she becomes friends with Katniss.  What you don't know is that they were allies for almost a week before she dies.  She reminds Katniss of her little sister, and that is why she takes her under her wing.

You also don't truly get to understand the relationship between Katniss and Peta either.  The spend a whole week in the capitol before they enter the games.  He truly loves her, and she is very confused about her feelings for him.  She hates him, she likes him, she's playing him, etc.

She's also confused about her feelings for Gale.  She loves him like a brother at first, but when she starts to have feelings for Peta, she starts questioning her feelings for Gale.

They also "toned down" a lot of the movie to make it PG-13.  The book was defiantly rated R.  The killing at the cornucopia was much more graphic and bloody.  The scene when Glimmer dies is a bit more disgusting (btw, Rue didn't give Katniss the idea to drop the bees nest, she came up with it in her own).  They cut out the day she almost died of dehydration, and she was burnt longer in the book, they kind of combined 3 days into one there.

Rue's death was very mild compared to how it was in the book...not to mention there is supposed to be these hovercrafts that remove the bodies, that's why she covered Rue in flowers.  Cloves death was down played as well.   But the most disappointing part was the end.  That is the coolest  and scariest part of the whole story, and they glossed over almost all of it, or skipped it all together!

The beasts are versions of the fallen tributes, they have their stature, eyes, and hair.  After Cato falls off the cornucopia the beasts drag him inside...he is stuck in there dying for a day.  Katniss and Peta have to listen to his cries of pain all night before she can finally reach him and shoot him in the head.

When they take the two back to the Capitol (after they win) Katniss goes a bit crazy, and Peta looses his leg (they skipped the part where he gets bitten and almost bleeds to death waiting for Cato to die)

I know they can't have the movies and the book be exactly the same, the movie would be too long, but I feel like they don't do a good job deciding what to cut out.  When I watched Harry Potter (after having read the books) I wasn't disappointed.  Sure they left parts out, and occasionally they were important parts, but I just didn't leave the theater feeling the least bit disappointed.  And those books were a hell of a lot longer than Hunger Games.  This is why I just skip the movies.  I haven't seen Water for Elephants, or The Help.  And I will never watch another Jodi Picult movie...they've screwed up every single one.  She is one of my favorite authors...she needs to stop allowing her books to be made into movies....they screw them up every time!

What are your feelings about turning books into movies?


Thursday, April 5, 2012

Water Marble Nails

I did some heavy duty gardening today and so as a result, my nails got a wee bit chipped.  Since I am going to see "Hunger Games" tomorrow I thought I would paint my nails in honor of the most kick ass book series of all time.  Well....I am not creative enough to make flames on my nails, but I thought I would give water marbling a try....after all its been all over Pintrest...must be good :)

Now there are videos on YouTube that give really good instruction, thats where I "learned".  But to be honest I'm more of a "just do it" kinda girl.  I learned a few tricks tonight, and I can't wait to try again with a few different colors.

Here's what you will need...

- Any thing you normally use for a manicure....nail file, clippers, cuticle pusher-backer LOL, buffer (it has come to my attention that buffing your nails is very important if you want your polish to last)
- The polish you want to marble with (2-3 colors are probably best)
- Base and Top coat
- Cup of Water
- toothpicks
- tape
-Q-Tips
-Nail Polish Remover


 I've been using this as my base coat.  I got it at Sally's Beauty Supply.  It suggests two coats, I only use one.  Make sure you allow plenty of drying time in-between each coat, another tip to help your polish last longer.

These are the three colors I used for the marbling.  Sally Hansen Nail Prisms Amber Ruby (I don't think they make this kind anymore), OPI An Affair in Red Square, and Orly Luxe.  The Prism color didn't show up very much in the marble...just one of those things you'll learn as you go.


After you are finished marbling (make sure it is completely dry to avoid smearing) make sure you finish it off with a top coat.


Start with clean dry buffed nails...add your base coat, wait for it to dry. 


Choose a color as your "color base coat".  Most of the videos I watched they used white, but that seemed stupid to me...I'm not using any white in my marbling, so I chose the lightest marbling color I am using.  I only did one coat, its just supposed to help fill in any gaps the marbling leaves.


I cut my Solo cup in half so it wasn't so tall.  Next time I think I will invest in some Dixie cups.  It looks better if the color is darker.  You need less polish if the cup is a little bit smaller, but thats personal preference. 


When you drop a drop (hehe) of polish into the water it spreads out.  Just keep dropping in colors until you get the spiral you want.  You then use a tooth pick to swirl the paint as you want it.  This is the trickiest part in my opinion.  You have to use a very light touch, and the paint needs to be still wet (you'll see what I mean).


I tried it without the tape first...just to see if I really needed it....yes, you really need it LOL.  My first finger didn't turn out so good, but you learn as you go :)  My finger looks cool though!  You will have to use a tooth pick to remove the access nail polish from the top of the water while your finger is still in the water.  It just skims right off the top.


 Finger #2 turned out much better...in fact I think its the best one on my left hand.  The tape makes clean up very easy.


Left hand done...wait until it dries before removing the tape. (My middle finger got a bit messed up, I tried to fix it...oh well)  Make sure you lift your finger out of the cup nail top first (so you nail is facing up) so you don't get any unwanted bubbles.


Time for clean up...remove the tape, and use the Q-Tips and polish remover to get the polish off your skin. 


Lovely!!!  <3 


Now time for the right hand....I went ahead and taped all my fingers to start with....its hard to add tape when your nails are wet....live and learn :)


This is my favorite nail...perfect!!!


Right hand done...time for clean up :)


Project complete!!!  If you have any questions leave them in the comments section and I'll answer as best I can.  The YouTube video I watched is this one www.youtube.com/watch?v=OO3NO29L50U 
 I admit that I watched it with the sound turned off (I was watching a movie...what can I say)

Enjoy you water marbling!!!!  Good Luck!!!!