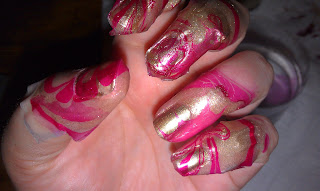
I did some heavy duty gardening today and so as a result, my nails got a wee bit chipped. Since I am going to see "Hunger Games" tomorrow I thought I would paint my nails in honor of the most kick ass book series of all time. Well....I am not creative enough to make flames on my nails, but I thought I would give water marbling a try....after all its been all over Pintrest...must be good :)
Now there are videos on YouTube that give really good instruction, thats where I "learned". But to be honest I'm more of a "just do it" kinda girl. I learned a few tricks tonight, and I can't wait to try again with a few different colors.
Here's what you will need...
- Any thing you normally use for a manicure....nail file, clippers, cuticle pusher-backer LOL, buffer (it has come to my attention that buffing your nails is very important if you want your polish to last)
- The polish you want to marble with (2-3 colors are probably best)
- Base and Top coat
- Cup of Water
- toothpicks
- tape
-Q-Tips
-Nail Polish Remover
I've been using this as my base coat. I got it at Sally's Beauty Supply. It suggests two coats, I only use one. Make sure you allow plenty of drying time in-between each coat, another tip to help your polish last longer.
These are the three colors I used for the marbling. Sally Hansen Nail Prisms Amber Ruby (I don't think they make this kind anymore), OPI An Affair in Red Square, and Orly Luxe. The Prism color didn't show up very much in the marble...just one of those things you'll learn as you go.
After you are finished marbling (make sure it is completely dry to avoid smearing) make sure you finish it off with a top coat.
Start with clean dry buffed nails...add your base coat, wait for it to dry.
Choose a color as your "color base coat". Most of the videos I watched they used white, but that seemed stupid to me...I'm not using any white in my marbling, so I chose the lightest marbling color I am using. I only did one coat, its just supposed to help fill in any gaps the marbling leaves.
I cut my Solo cup in half so it wasn't so tall. Next time I think I will invest in some Dixie cups. It looks better if the color is darker. You need less polish if the cup is a little bit smaller, but thats personal preference.
When you drop a drop (hehe) of polish into the water it spreads out. Just keep dropping in colors until you get the spiral you want. You then use a tooth pick to swirl the paint as you want it. This is the trickiest part in my opinion. You have to use a very light touch, and the paint needs to be still wet (you'll see what I mean).
I tried it without the tape first...just to see if I really needed it....yes, you really need it LOL. My first finger didn't turn out so good, but you learn as you go :) My finger looks cool though! You will have to use a tooth pick to remove the access nail polish from the top of the water while your finger is still in the water. It just skims right off the top.
Finger #2 turned out much better...in fact I think its the best one on my left hand. The tape makes clean up very easy.
Left hand done...wait until it dries before removing the tape. (My middle finger got a bit messed up, I tried to fix it...oh well) Make sure you lift your finger out of the cup nail top first (so you nail is facing up) so you don't get any unwanted bubbles.
Time for clean up...remove the tape, and use the Q-Tips and polish remover to get the polish off your skin.
Lovely!!! <3
Now time for the right hand....I went ahead and taped all my fingers to start with....its hard to add tape when your nails are wet....live and learn :)
This is my favorite nail...perfect!!!
Right hand done...time for clean up :)
Project complete!!! If you have any questions leave them in the comments section and I'll answer as best I can. The YouTube video I watched is this one www.youtube.com/watch?v=OO3NO29L50U
I admit that I watched it with the sound turned off (I was watching a movie...what can I say)
Enjoy you water marbling!!!! Good Luck!!!!


No comments:
Post a Comment